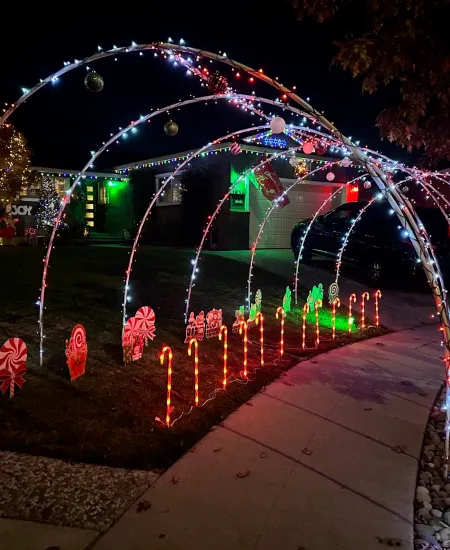
Why Build a Lighted Archway?
Every holiday season has its quirks, but here’s one thing that remains timeless: the charm of twinkling lights. There’s something about the glimmer they add to the chilly winter evenings. Last Christmas, I decided our ordinary sidewalk needed a bit more pizzazz, and what better way to spice things up than with a lighted archway? If you’re like me, always on the lookout for ways to enhance your home's holiday spirit, building a lighted archway could be your next best project.
Not only does the archway add a grand entryway vibe, perfect for family photos or welcoming your holiday guests, it can also transform an ordinary pathway into a magical passage. The best part? It's a project that blends creativity with utility, serving as both a decoration piece and a subtle guide through your garden or entryway.
Gathering Your Supplies
Speaking from experience, there’s nothing worse than starting a project only to realize you’re missing half the supplies. Trust me, I learned it the hard way! Here’s what you’ll need to create a stunning lighted archway:
- Flexible PVC Pipe or Metal Arches: I prefer PVC pipe for its flexibility and ease of handling. You'll want it thick enough to be durable but flexible enough to bend into shape.
- Weatherproof String Lights: Choose LED lights for their long-lasting and energy-efficient qualities. Plus, they come in various colors and brightness levels. (nytimes.com)
- Zip Ties or Wire: These will help you secure the lights to the arch. Zip ties are easier to handle and cut off, making them perfect for novices.
- Ground Stakes or a Concrete Base: This depends on where you’re setting up your archway. Stakes work fine for soft ground, while a concrete base is ideal for harder surfaces or permanent installations.
- Additional Decorations: Think garlands, baubles, or anything festive to add that extra touch.
Take measurements of your sidewalk or entryway first to determine the quantity of these materials. Over my years of decorating, nothing beats precise initial measurements for ensuring everything looks proportional and enchanting. For more inspiration on bold outdoor pieces, check out how to make oversized ornaments with lights for your yard.
Creating the Structure
The fundamental step is building your archway’s skeleton. My first attempt was a comedy of errors; I ended up with an arch more suitable for hobbits than humans. Here's how to avoid my blunders:
- Measure the Height and Width: Consider the natural pathway of your sidewalk or entryway. Too high or too wide might overshadow the surrounding decor, while too small might not make the desired impact.
- Bend the PVC Pipe or Metal: If using PVC, you might need a heat gun to soften it for easier bending. Metal arches are often pre-formed, making them simpler to install.
- Secure the Arches: Use ground stakes or a concrete base to install the arch. Ensure it's securely fastened; you don’t want it wobbling every time there's a breeze.
Remember, patience is key here. Rushing through this part can lead to uneven heights or, worse, a collapsed structure!
If you’re incorporating the arch into a larger animated setup, consider looking into how to design your own animated light display for ideas on synchronized effects.
Stringing the Lights
Here comes the fun part! Wrapping the lights might seem straightforward, but strategic placement will maximize the magical effect:
- Start at the Bottom: Begin wrapping from the base of one side, moving upwards in a spiral. Ensure the lights are evenly spaced. If you run out, it's much easier to add an extension at the ground level than at the top.
- Secure the Lights: Use zip ties or wire every few feet to keep the lights from sagging. Trust me, droopy lights can really spoil the look!
- Connect Extra Strands Carefully: If your archway is wide, you might need more than one strand of lights. Make sure to tuck away or camouflage the connecting wires—that can make or break the visual elegance.
And a small tip from my last year's mishap: check that all lights work before you start wrapping. Re-wrapping them is no fun at all!
Finishing Touches
Your basic lighted archway is now pretty much ready. But why not elevate it with some personal touches? Last year, I intertwined some red and gold garland through mine, and it was a game-changer. You might also consider:
- Hanging Ornaments: Small, light baubles can add depth and interest.
- Festive Ribbons: These can add color and movement, enhancing the festive feel.
- Artificial Snow Spray: For those dreaming of a white Christmas, this can add a frosty charm.
For more lighting ideas that complement your archway, especially if you’re decorating windows, take a look at how to frame windows with lights using custom wire guides.
Make it a reflection of your personal style; after all, this is your holiday masterpiece.
Practical Takeaways
Enhancing your home’s exterior with a lighted archway not only boosts your festive decor but also makes your space more inviting. Remember, the key to a successful project is planning: measure twice, cut once, and always double-check your supplies. Also, integrating seasonal elements into your archway can make it a standout feature year after year.
So, whether you’re an avid DIYer or a festive season enthusiast, give this project a go. You might find that the glow from your new archway not only lights up your yard but also brings a little more light into your life during the holiday season. And isn’t that what this time of year is all about?
Subscribe to our email newsletter and unlock access to members-only content and exclusive updates.

Comments