Turning Your Porch into a Beacon of Holiday Cheer with Light-Up Gift Boxes
There’s something magical about the way a porch decked out in twinkling lights and festive decorations can elevate the holiday spirit. I remember how my neighborhood would come alive each December, with each house trying to outdo the last in a friendly show of holiday cheer. Inspired by this, I decided to add a unique sparkle to my own porch light-up gift boxes - a project that turned out to be as rewarding as it was captivating.
In this piece, I’ll guide you through everything you need to create your own glowing parcels that promise to transform your porch into a whimsical landscape. Whether you're a craft newbie or a DIY enthusiast, these steps will help you design a festive display that will be the talk of the town.
Materials Needed to Create Your Light-Up Gift Boxes
Before diving into the craft, gathering all the necessary materials ensures that the creative process flows smoothly without any frustrating interruptions. Here’s what you’ll need:
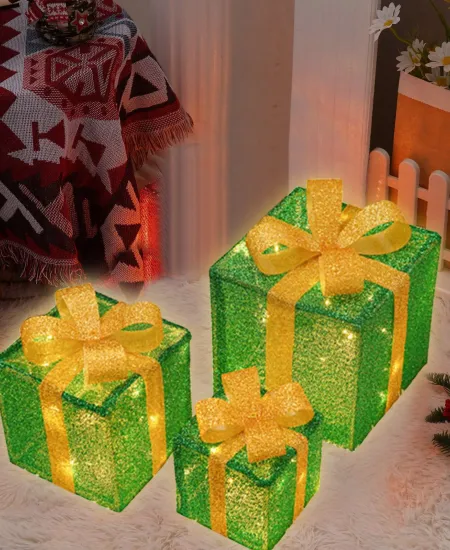
- Cardboard boxes - Choose varying sizes for a dynamic look.
- Wrapping paper - Go with festive or bright colors.
- Battery-operated LED lights - Ensure they’re suitable for outdoor use if your porch isn’t covered.
- Clear plastic sheets - These will mimic the feeling of unwrapped gift boxes.
- Scissors, tape, and maybe some glue - For cutting and sticking materials.
- Optional embellishments: ribbons, bows, or synthetic holly sprigs to add flair to your boxed creations.
Choosing the right materials is key. For the LED lights, for example, I made sure to select waterproof versions because the weather around Christmas time can be pretty unpredictable. It’s little considerations like these that can make or break your festive display.
Step-by-Step Guide to Creating Your Festive Porch Masterpiece
With all your materials at hand, it’s time to start crafting. Here’s how I did it:
Step 1: Prepare Your Boxes
First, assemble your cardboard boxes. If they aren’t new, make sure they’re clean and sturdy. Size them up: a few big ones for the base, medium ones stacked on top, and perhaps a few small ones to dot around them.
Step 2: Wrap ‘Em Up
Wrap each box in your chosen holiday wrapping paper. For a more refined look, neatly tuck in the paper corners and secure them with tape. To make the boxes weather-resistant, I also covered the wrapped boxes with clear protective sheets—almost like putting a raincoat on each of your gift boxes.
Step 3: Illuminate
This is where the magic happens. Arrange the LED lights inside each box. Spread them out evenly to ensure that each corner of your box glows beautifully. Considering the size and depth of the box, you might want to use different amounts of strands or bulbs to get the desired brightness. If you want to go even bigger, consider making oversized ornaments with lights to complement your gift boxes.
Step 4: Seal and Decorate
Close up your boxes, making sure the on/off switch for your lights is accessible for ease of use. Now, decorate them with bows, ribbons, or any other embellishments you fancy. Remember to balance visibility with protection from potential rain or snow.
This creative journey might remind you of dressing a tree. There’s a knack to arranging the boxes so they're aesthetically pleasing while also structurally sound—especially if you have curious pets or little ones who might be tempted to explore!
Tips for Weather-Proofing and Maintenance
Having learned a few lessons the hard way, here are tips to keep your light-up gift boxes shining bright throughout the festive season:
- Check the forecast: Ensure your lights are both weatherproof and rated for outdoor use. Switch them off during particularly bad weather. Or better yet, add a bit of structure with a covered porch frame using custom wire guides for lights.
- Regular checks: Every few days, check on the structural integrity of the boxes and the function of the lights.
- Battery care: Change the batteries before they run completely dry to avoid dimming lights at the peak of holiday evenings.
Last year, I had to change the entire lighting inside one of the boxes because I missed the signs of battery leakage—it was a good lesson in proactive maintenance.
A Festive Porch that Welcomes All
When I first undertook this project, it was about adding a little extra glow to my home for the holidays. Little did I know, these light-up gift boxes would turn into a beacon of joy for anyone who passed by. Kids would stop and gaze in awe, and adults took it as an open invitation to spread holiday cheer.
Creating these gift boxes not only brightened my porch but also illuminated the real spirit of the season—sharing and bringing smiles. If you’re feeling even more inspired, consider pairing your porch scene with a giant LED snowflake or a light-up reindeer silhouette nearby to build out a fully immersive holiday display.
Try crafting your own set of light-up gift boxes this year; it’s a satisfying project that beautifies your space and warms the hearts of witnesses. Moreover, it’s a glowing testament to the joy of DIY and the magic of Christmas. (thecraftpatchblog.com)
Happy crafting, and here’s to a porch that not only shines bright but also welcomes the holiday spirit into every observer’s heart!
Subscribe to our email newsletter and unlock access to members-only content and exclusive updates.
Comments