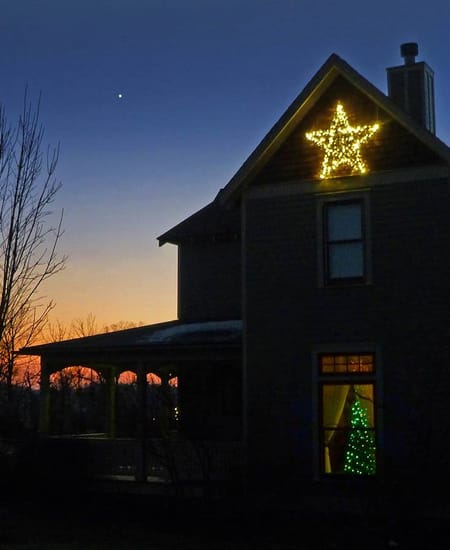
Light Up Your Holiday Spirit: DIY Lighted Star for Your Roof
Ah, the festive season! A time for hot cocoa, cozy blankets, and, of course, dazzling lights that brighten up frosty evenings. As I started decking out my house last year, I realized that while string lights and inflatable characters are fun, nothing quite says "it's the holidays!" like a homemade, lighted star perched proudly on the roof. If, like me, you've ever wondered about adding that eye-catching element to your roof without breaking the bank, you’re in the right place. Let me walk you through how I crafted a magical rooftop star, along with some helpful tips I picked up along the way. (instructables.com)
Preparation is Key
Before diving into the nitty-gritty of construction, gather all the necessary materials. Trust me, realizing you’re missing a crucial component mid-project is as frustrating as untangling last year's lights. Here’s a handy list:
- Flexible LED rope lights: These are going to outline your star and give it that glorious glow. I learned the hard way that picking a weatherproof option is essential for outdoor decorations. For more rope light ideas, you might enjoy making a giant snowflake with LED rope lights.
- Lightweight wood or PVC piping: Durable yet easy to handle, these materials form the structure of your star. I opted for PVC for its weather resistance and ease of use.
- Zip ties: Your new best friends for securing the lights to the frame.
- Measuring tape, saw, and drill (if using wood): Precision is your ally.
- Outdoor extension cord: Ensure it's long enough to reach your nearest outdoor outlet.
- Safety equipment: Gloves and goggles aren't the most festive accessories, but safety never takes a holiday!
Now, onto the fun part!
Constructing Your Star
Following instructions from some tutorial might seem a snooze, but it's a recipe for success. Follow these steps:
- Shape Your Frame: Measure and cut your material into five equal strips for a classic five-pointed star. The length depends on how large you want your star; mine were each 6 feet long. Lay them out on a flat surface and arrange them into a star shape. Connect each point using strong glue or screws - I found screws hold better in windy weather.
- Attach the Lights: Unroll your LED rope lights and lay them loosely following the shape of the star to plan your design. Starting at one point, secure the lights with zip ties. Keep the layout even and make sure you have enough rope to complete the pattern. Avoid pulling too tight; you don't want to bend the frame.
- Power It Up: Once all the lights are attached, carefully connect the rope light to the extension cord using a watertight outdoor connector if necessary. I wrapped mine with insulating tape just to be safe.
And voilà! You now have a sparkling star ready to crown your roof. But before hoisting it up, let's talk about installation.
Mounting Your Masterpiece
Securing a giant lit star onto your roof might sound daunting. Here’s how to do it safely:
- Check the weather: Choose a calm, dry day for installation. Winds or ice can turn this project from fun to fraught.
- Get some help: A buddy system is essential for balance and safety—the more, the merrier (and safer).
- Use a sturdy ladder: Ensure it is well-footed and reaches higher than the edge of your roof for ease and stability.
- Secure well: Depending on your roof type, you may use ropes, weights, or hooks to secure the star. Ensure it’s mounted tightly to avoid any 'The Star That Stole Christmas' headlines.
Lighting It Up
With everything secure, step back as sunset fades and watch your creation come to life. A flick of the switch, and behold the glowing symbol of your handiwork shining down! Celebrating this small victory with family or neighbors not only spreads joy but shares the spirit of creativity and togetherness of the season.
Lessons Learned and Final Thoughts
Looking back on this project, there were a couple of lessons I wish someone had shared with me:
- Always measure twice: It saves you the 'Oh no' moment of having mismatched points.
- Invest in quality materials: Especially the lights. Cheaper options failed after a few rainy nights.
If you're feeling the DIY holiday spirit, you might also enjoy creating custom light-up signs for your yard or taking your display to the next level with animated light shows.
Creating a DIY lighted star for your roof might seem like just a festive decoration, but it’s more than that. It’s a beacon of your ingenuity and festive spirit. So why not invite a few friends over, serve up some hot drinks, flick the switch, and enjoy the collective awe of your masterpiece? (dukemanorfarm.com)
Go on, light up your world this holiday season. You’ve got this!
Subscribe to our email newsletter and unlock access to members-only content and exclusive updates.
Comments