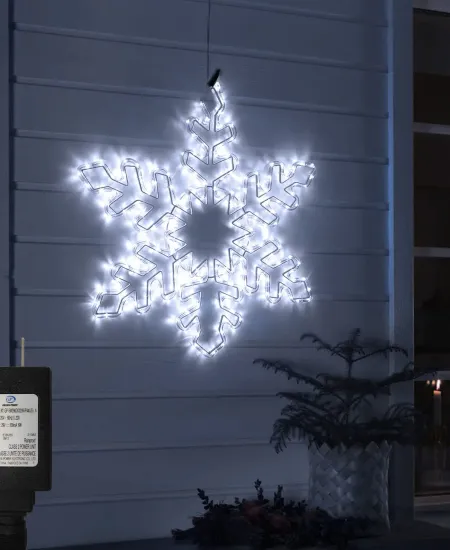
Embarking on a Festive DIY Journey: Making a Giant Snowflake with LED Rope Lights
Have you ever wondered how those stunning, large-scale holiday decorations come to life? The ones that dazzle and light up the night, making everything feel like a winter wonderland? I certainly did, after spending one too many seasons envying my neighbor's jaw-dropping outdoor display. Last year, inspired (and a bit competitive, I admit), I decided it was time to create my own masterpiece: a giant LED snowflake.
This isn't just any craft project. It's a journey—an adventure in wiring, design, and creative problem-solving. If you're ready to tackle a show-stopping decoration that will light up your holidays (and possibly outshine the Joneses), then grab your wire cutters and follow me into the world of DIY holiday decor with a step-by-step guide on making your giant snowflake. (abeautifulmess.com)
What You'll Need to Get Started
First things first, let’s talk materials. Building a giant snowflake may sound like rocket science, but the materials you need are surprisingly straightforward. Here’s what you’ll need:
- LED rope lights (preferably white, but feel free to get creative with colors)
- Clear zip ties
- A large wooden or plastic frame (you can use an old circular table top or construct a frame from scratch)
- Wire cutters
- Measuring tape or a ruler
- Outdoor-grade extension cords
- Screw hooks (for mounting)
Making sure you have the right type of LED rope lights is crucial. Opt for the ones specifically labeled for outdoor use to ensure they can withstand winter weather. If you’re repurposing old decorations, you might enjoy this guide on how to reuse old lights in creative ways.
Designing Your Snowflake: More Than Just Sticking to Symmetry
Now onto the fun part—design! If there's one thing I learned, it's that symmetry is your friend. A snowflake's magic lies in its radiant, symmetrical pattern. To start, sketch your snowflake design on paper. This doesn’t need to be a work of art; it’s just a blueprint to guide your construction.
When I drew mine, I aimed for six main arms originating from a central point, with smaller, intricate branches stemming off each main arm. The sketch helped me visualize the project and served as a reference throughout the building process. If you enjoy crafting unique shapes from scratch, you might also love building a DIY reindeer silhouette with lights—another festive project worth checking out!
Constructing Your Snowflake Framework
The framework is essentially the skeleton of your snowflake. If you're using a round table top or any pre-shaped frame, ensure it’s large enough to make an impact. Otherwise, you might have to build a frame from scratch using sturdy materials like PVC pipe cut to your desired length and joined together in a snowflake shape.
Arrange these structural pieces on a flat surface, according to your design, and secure them with tape or small clamps before you start attaching the lights. This setup phase is crucial— it’s much easier to adjust a few pieces of tape than to reposition lights once they’re secured.
Wrapping the Lights: Patience Makes Perfect
Wrapping the LED rope lights around your frame might just be the most therapeutic part of this whole project. Start from the center point of your snowflake, securing the end of the rope light with a zip tie. Carefully wrap the lights along the arms of your frame, securing with zip ties every few inches to prevent sagging.
Here’s a tip: maintain a consistent tension on the rope light as you wrap it. Too tight, and you might warp your frame; too loose, and the lights will droop. Finding that happy medium is key. Oh, and keep your wire cutters handy—you’ll need them to trim zip ties as you go! You can take this up a notch by incorporating ideas from animated light display design if you’re thinking of adding movement or syncing to music.
Electrical Connections and Safety
Ensuring your snowflake is not only beautiful but also safe, is paramount. Connect your LED rope lights to an outdoor-rated extension cord. If your design requires more than one strand of lights, use a weatherproof connector to join them. Always ensure that all connections are secure and well-insulated to prevent any potential short circuits.
Depending on where you’ll be mounting your snowflake, you might also want to invest in a timer or a remote control system. It’s not only convenient but also quite magical to light up your creation with the click of a button! Or, if you're ready for an even more high-tech holiday upgrade, you could explore syncing lights with music to make your snowflake pulse to your favorite carols.
Mounting Your Snowflake: Let There Be Light!
The final step—mounting your snowflake. Choose a focal point visible from the street or the heart of your yard. Use sturdy hooks and ensure your installation spot can support the weight of your creation. Adjust the angle and position until you achieve the perfect display, then step back and admire your work as it brightens up the long winter nights.
For a fully cohesive look, consider pairing your snowflake with oversized light-up ornaments or a DIY light chandelier to add dimension to your display.
My giant snowflake was a triumph that not only lit up our home but also brought a sense of accomplishment and joy. It became a conversation starter and, dare I say, the star of the neighborhood’s holiday decorations.
Takeaways from a DIY Holiday Adventure
Creating a giant snowflake with LED rope lights might seem daunting at first glance, but it's all about taking it one step at a time. Here's what I'd love for you to take away from this experience:
- Plan thoroughly. A good plan will save you time, resources, and a lot of frustration.
- Embrace the process. Enjoy each step, from design to execution.
- Don’t rush. Taking your time ensures safety and quality in your work.
- Be creative. Your snowflake doesn’t need to be perfect or look like everyone else’s—make it uniquely yours.
In the end, whether it’s adding a little extra glitter or opting for multicolored lights, your personal touch will shine through, making your snowy spectacle not just a decoration but a reflection of your creativity and holiday spirit. Light up your home, inspire your neighbors, and most importantly, have a bundle of fun doing it. Happy decorating!
Subscribe to our email newsletter and unlock access to members-only content and exclusive updates.
Comments