Transforming Your Outdoor Space with Creative Wood Cutouts and Light Designs
Have you ever strolled through a winter wonderland of Christmas lights and wondered how you could replicate that magical glow in your own yard? Last year, I decided to tackle this very challenge, focusing not just on stringing lights, but on creating unique, illuminated sculptures with wood cutouts. The experience was a whirlwind of sawdust, spilled paint, and oh-so-many light bulbs, but the end results? Absolutely worth it.
This deep dive into using wood cutouts to support outdoor light shapes is not just about decorating—it's about transforming ordinary spaces into something extraordinary. I'll walk you through what I learned, the techniques that worked (and those that didn't), and how you can light up your outdoors with a personal touch that will wow your neighbors and light up your spirits.
Understanding the Basics of Woods and Tools to Use
Before sawing into your first plank of wood, it’s crucial to know a thing or two about the materials and tools. My first experience sawing wood was both exhilarating and a bit of a comedic disaster—I ended up with a board cut so unevenly it looked like a skyline rather than a straight line. Here’s a breakdown of what you’ll need:
- Wood Type: I recommend using plywood for outdoor projects due to its durability and ease of cutting into shapes. Marine plywood is ideal as it’s designed to withstand moisture—a common element outdoors. (sharonply.com)
- Saw: A jigsaw is perfect for intricate cuts. Make sure it’s equipped with a sharp blade specific for wood cutting.
- Sander: After cutting your shapes, you’ll want to sand down the edges and surface for a smooth finish. A simple hand sander works, but for larger projects, an electric sander saves time and effort.
- Sealant: To protect your cutout from the elements, coat it with a weatherproof sealant. This maintains the integrity of the wood and prevents rot.
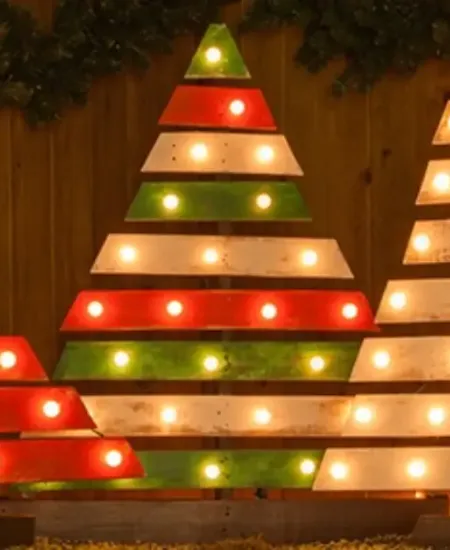
Designing Your Light Shapes with Precision
One chilly November evening, I sat down with a cup of hot cocoa and sketched my dream Christmas display—complete with reindeer and sleigh. Whether you’re creating a simple star or an elaborate Santa scene, designing beforehand makes all the difference. Here are some tips based which can prove to be valuable:
- Use Templates: For precision, create or print out a paper template of your design. Tape it onto your wood and trace it before cutting. This minimizes mistakes and ensures your cutout matches your vision. (instructables.com)
- Think About Light Placement: Consider where lights will enhance the design. For instance, outlining a star or filling a reindeer’s silhouette can add depth and vibrancy. You can get more ideas from this guide on how to paint and light your own holiday lawn characters.
- Scale Accordingly: Ensure your designs are proportional to the space they’re decorating. A giant cutout might look fabulous, but only if you have the room to display it!
During my first attempt, connecting the lights felt like solving a puzzle on a freezing ladder—tricky and a bit nerve-wracking. But with practice, it became a highlight of my holiday prep.
Lighting Techniques That Bring Designs to Life
Now comes the magical part—lighting your wood cutouts. The right lights not only illuminate your designs but also enhance their look after the sun sets. Here’s what you need to know:
- LED Lights: Choose LED lights for their efficiency and brightness. They are available in various colors and sizes, allowing you to create the ambiance you desire. For a creative twist, consider this tutorial on how to create a DIY projector light from LED strips.
- Weatherproof: Ensure all lighting is suitable for outdoor use. This prevents short circuits and other hazardous issues.
- Wiring: Hide wiring behind or along the edges of the wood cutouts for a cleaner look. Use weather-resistant tape to secure them in place.
- Power Sources: Plan how you will power your lights. An outdoor-rated extension cord might be necessary if your power outlet isn’t near.
Setting Up Your Display: Tips and Tricks
The real test came when I set up my very first light-filled wood cutout display. Here’s how to do it without a snag:
- Stability is Key: Ensure your wood cutouts are securely anchored to the ground. I learned the hard way when a gust of wind sent my first set of reindeer tumbling across the yard.
- Check Lighting at Night: It seems obvious, but make sure to test your display in the dark. Adjust the light placement and intensity to get the desired effect. Also, you might want to explore these ideas on how to add motion to static outdoor light displays to make your setup even more dynamic.
- Safety First: Regularly check for any frayed wires or loose connections. Outdoor lighting can be exposed to harsh conditions, so keeping an eye on these details is crucial.
As I flicked the switch on my first creation, the twinkling lights cast a glow that was downright magical—a glow that became even brighter with the smiles of my family.
Final Reflections and Your Turn to Shine
Building and displaying these light-enhanced wood cutouts was more than a holiday project; it was a memorable adventure in creativity and perseverance. Whether you’re aiming for a simple, elegant light display or an elaborate themed setup, the joy lies in the making.
I hope this guide inspires you to light up the exterior of your home for Christmas in a way that captures the magic of the season. Remember, the process might involve a bit of trial and error, but the results can light up more than just your yard—they can light up your whole holiday spirit.
So, grab your tools, sketch your designs, and let your holiday lights shine brighter than ever this year!
Subscribe to our email newsletter and unlock access to members-only content and exclusive updates.
Comments